
Using the Ext Scheduler requires some basic ExtJS skills and a little HTML knowledge doesn't hurt either. If you're not familiar with ExtJS, I highly recommend you start in the learning section of the ExtJS website or checkout some of the great examples. Since the scheduler is based upon the ExtJS GridPanel it helps if you know these classes:
Conceptually, you can think of the SchedulerPanel as a marriage between a GridPanel and a DataView.
To make the setup as smooth as possible we have prepared a diagnostics utility to help you if you get stuck while setting up the scheduler. Download it here. To use it, include the script on your page and load it. Then use the FireBug console to call "schedulerDiagnostics();". This function does some basic checking of your setup to make sure things look ok. If the diagnostics tool doesn't help you you're always welcome to email us at support@ext-scheduler.com.
Let's start off with some terminology. The data shown in the scheduler is logically separated into two different entities, Resources and Events. They are also stored separately in two separate stores. The resources are what goes into the regular gridpanel store and the events go into another store which you assign to the grid through the eventStore property. See the picture below:
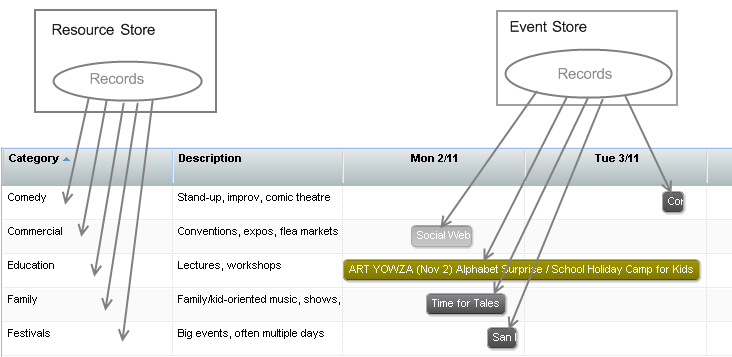
This means, if you are doing a dentist booking application then your dentists and all your data about them would go in the resource store, and all the appointments would go in the event store. Now the only thing missing is a link between the two entities and this mapping is done through the Id property of the Resource and the ResourceId property on the Event. A quick code example of how this could look:
    // Store holding all the resources
    var dentistStore = new Ext.data.JsonStore({
        sortInfo:{field: 'Name', direction: "ASC"},
        fields :[
            // Mandatory field
            'Id',

            // Application specific metadata
            'Name',
            'PhoneNumber'
        ]
    });

    // Store holding all the bookings
    var appointmentStore = new Ext.data.JsonStore({
        sortInfo: { field: 'CustomerName', direction: "ASC"},
        fields : [
            // Mandatory fields

            {name:'StartDate', type : 'date', dateFormat:'time'},
            {name:'EndDate', type : 'date', dateFormat:'time'},
            {name:'ResourceId', type:'string'},

            // Application specific metadata
            {name:'CustomerId'},
            {name:'CustomerName'}
        ]
    });

    var g = new Sch.SchedulerPanel({
        height : 500,
        width : 1000,
        store : dentistStore,
        eventStore : appointmentStore,
        ...
    });
If your data doesn't match the record definitions above you can use the 'mapping' property or 'convert' property of the Ext.data.Field class to adapt your data into the structure of the scheduler stores.
To get the schedulerpanel up and running, you need only the stores and 2 other things: A definition of what columns to display in which time intervals and lastly you need to load the event store.
Let's look at the first thing - the time columns. The schedulerpanel accepts a property called autoViews, which determines which column resolution to use for different time intervals. Sounds complicated? It's not. Let's look at some code first:
    var g = new Sch.SchedulerPanel({
        ...
        // Setup view configuration
        autoViews : [
            // Timespan <= 7 days show day columns
            {
                timeSpan : 7,
                columnType : 'day',
                renderer : this.oneDayRenderer,
                viewBehaviour : Sch.ViewBehaviour.DayView
            },
            // Timespan > 7 days && <= 6 weeks
            {
                timeSpan : 42,
                columnType : 'week',
                renderer : this.renderer,
                viewBehaviour : Sch.ViewBehaviour.WeekView
            },
            // Timespan > 6 weeks show month columns
            {
                timeSpan : 365,         // Something larger than previous timeSpan (42)
                columnType : 'month',
                renderer : this.renderer,
                viewBehaviour : Sch.ViewBehaviour.MonthView
            }
        ], ...
Let's study the code above. In plain text it translates to:
New column types are easy to create according to your own needs. And you can use different renderers for different time spans. Now let's look at the view config object in more detail. Each view definition above has 4 properties:
The scheduler comes with a number of builtin column types such as 'hour', 'day', 'week' and 'month'. If you need different kinds of columns, just extend the column factory with another constructor function.
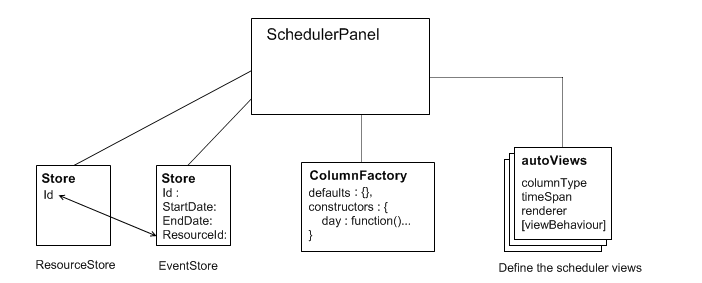
I hope this gives you an idea of the architectural approach for the SchedulerPanel. If there are things missing or something is poorly explained, please send me a message (details on the start page). A final diagram to summarize this introduction:
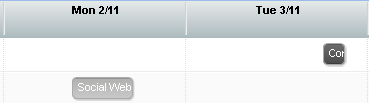
The events you see in the image below are created using an Ext.Template. The data in the event store is applied to this template through the renderer function assigned to the current view (as defined in the autoViews array). The renderer is called once for each item as they are rendered.
This template is a property of the SchedulerPanel and defaults to:
    /*
     * @cfg {Ext.Template} eventTemplate
     * Event template used to create the HTML for an event
     */
    eventTemplate : new Ext.Template(
        '<div id="{id}" style="width:{width}px;left:{leftOffset}px;" class="sch-event {cls}">',
            '<div class="sch-event-inner x-unselectable">{text}</div>',
        '</div>').compile(),
So in order to create the 'Social web' event in the picture, you'd really only need to create a renderer like the one below:
   autoViews : [
        {
            timeSpan : 7,
            columnType : 'day',
            renderer : function (eventRecord, r, row, col, ds) {
                // This object gets applied to the event template
                return {
                    text : eventRecord.get('Title')
                };
            },
            viewBehaviour : Sch.ViewBehaviour.DayView
        },
        ...
The parameters of the renderer function are the same as for a normal GridPanel renderer, except for the first value. In a GridPanel the first parameter is the value of the record property mapping to this column. In the SchedulerPanel, it's the event record that's about to be rendered.